While He Was Napping

momma gets stuff done

  • Home
  • About
  • Archive
  • Do It Yourself
    • Crafts
      • No Sew
      • Painting
      • Paper Crafts
      • Repurpose Projects
      • Vinyl
      • Washi Tape
      • Kid’s Crafts
      • Fonts
    • Sewing
    • Decorate
      • Home Decor
      • Holiday Decor
    • Celebrate
      • DIY Gifts
      • DIY Your Party
  • Recipes
    • Beverages
    • Appetizer
      • Bread
      • Other Appetizers
    • Snacks
    • Main Dish
      • Meat
        • Chicken
        • Beef
        • Pork
        • Seafood
      • Vegetarian
      • Slow Cooker
      • 30 Minute Meals
    • Dips & Sauces
    • Salads
    • Pasta
    • Soup
    • Dessert
      • Cookies
      • Brownies
      • Cupcakes and Cake
      • Box Mix Recipes
      • Other Sweet Treats
    • Breakfast Food
      • Pancakes
      • Waffles
      • Muffins
      • Other Breakfast Food
  • Family
    • Babies
      • Pregnancy
      • Newborns
      • The 1st Year
    • Toddlers
    • Preschoolers
    • Kindergartners
    • 6-8 Year Olds
    • The Grown Ups
      • Date Night
      • Romantic Gifts
    • Self Care
  • For the Home
    • Cleaning
    • Organizing
    • Emergency Preparedness
  • Travel
    • Travel Tricks & Tips
    • Traveling with Kids
  • Tech & Gadgets
    • Must-Have Apps
    • Techy Home Appliances
    • Gadgets & Electronics
    • Blogging Tips
  • Printables
    • Posters
      • Quote Printables
      • Subway Art Printables
    • Printable Organizers
    • Printable Journals
    • Learning Printables & Worksheets
    • LDS Printables
  • Holidays
    • New Year’s
    • Valentine’s Day
    • St. Patrick’s Day
    • Easter
    • Cinco de Mayo
    • Mother’s Day
    • Father’s Day
    • 4th of July
    • Back to School
    • Halloween
    • Thanksgiving
    • Christmas
    • Holiday & Seasonal Printables

May 2, 2014 by Krista

15 Mother’s Day Gift Ideas

Mother’s Day is coming up in a couple weeks and I am trying to come up with some gift ideas for my mom.  She’s a pretty easy person to gift for… but that actually makes it hard.  She doesn’t really need anything, but she doesn’t get rid of things she doesn’t need either.  So, whatever we give her will probably stick around for years (and years and years) to come.  So, I’m still brain-storming on what to give her that I want to have my name attached to for years to come.

In the meantime, I have gathered up some ideas for your gifting consideration.  Take a looksie.

Nautical Net Lanterns
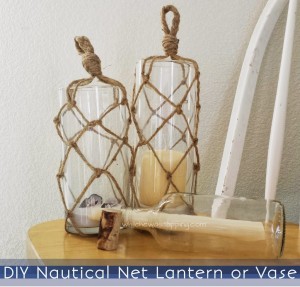
or try your hand at a DIY version
Nautical-Net-Lantern1
Mother Bird Necklace
This necklace represents my mom’s grandbabies last year
(two boys and one girl – two blue and a silver)  Guess she needs a new one…
Inspirational Quotes & Frame
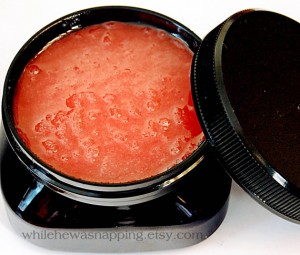
Sugar scrub is a great gift for all mommas.  Help clean and
moisturize momma’s hands from all those grubby germs she encounters.
Or find a sugar scrub recipe online and go the DIY route.
Backless Framed Quote
DIY Lanterns
How pretty would this be with some black & white photos inside the frames?
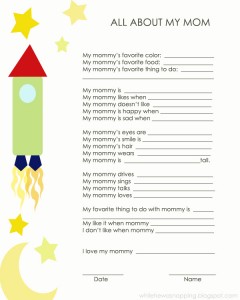
Print out and fill in these fun pages to find out how the littles really see momma.
Girl themed print available too.  Do it every year and watch the answers change.
Mother’s Prayer Printable (in blue or green)
Frame this poem that captures the essence of motherhood and let her know that all the rough days really are worth it, and that you appreciate her patience and tolerance on those rough days…
Or this printable…
Or use this printable
Pair it with your fave photo of you and your momma in a collage frame.
 
You can also create your own printable with your own quote
or a custom and personalized subway art piece.
A fun coupon book will let momma choose what gift she wants!
How about a personalized “Our Mom Loves” Plaque…?
Same idea as the Dad plaque, but for Momma.
Help Mom organize her jewelry with a Cork board Jewelry Organizer
Grab Momma an App Store or Play Store gift card and include a list of apps she might like.
Check these posts out for some great app ideas:
Apps for productivity and phone customization
Apps for making Momma’s life a little easier
Or for the soon-to-be Momma’s out there… Eight awesome apps
(some of these can rock grandma’s cell too!)
What are you giving your momma?

This post was written by Krista and originally appeared on While He Was Napping.

May 1, 2014 by Krista

{Two Texas Gals} Pepperoncini Pepper Roast

Brooke from Two Texas Gals is here to share a delicious, super tasty recipe with us today.  It’ll make your mouth water, so be sure to pin this so you can come back to it.  Because you already have dinner planned for tonight, right?  Yeah, me neither.  Take it away, Brooke!  I have dinner I gotta figure out…

______________________


Pepperoncini Pepper Roast
What You Need:
1 Roast (Size depends on how many you are cooking for)
1 Large Bottle of Italian Dressing (I use low fat)
1 Jar of Pepperoncini Peppers
To Make:
Put Roast into crock pot
Cover with Italian Dressing and Pepperoncini Peppers
(Make sure roast is covered- More dressing and peppers may be needed for larger roasts)
Turn crock pot on low.
Let cook for 6-8 hours. (Cook time varies based on roast size)
Serve with pasta or your side of choice {See photo 1}
Or shred and serve on toasted buns with mozzarella cheese! {Photo 2}


______________________
Doesn’t that sound fantastic?!  I think I figured dinner out for tonight.  Southern cooking at it’s finest, my momma would be proud.  And hungry.  Thanks, Brooke!  Be sure to stop in to Two Texas Gals and give Brooke a shout out!


This post was written by Krista and originally appeared on While He Was Napping.

April 30, 2014 by Krista

Jello Snickerdoodle Cookies

Do you love snickerdoodles? Then, I’ve got a fun twist for you today. These Jello Snickerdoodle cookies take all the best parts of a snickerdoodle and add some zing. It’s a fun way to add a pop of flavor to your cookies… not to mention, just look at those colors!! Admittedly, I think that was my favorite part. Are you ready to kick your cookie game up a notch with these jello snickerdoodle cookies?

JELLO SNICKERDOODLE COOKIES

Jello Snickerdoodle Cookies


JELLO SNICKERDOODLE COOKIES ARE PERFECT FOR EVENTS

Trying to color-coordinate treats with an event? Look no further! The colors you can create with this recipe are nearly endless and you’re sure to end up with just what you need. Without a ton of work! Simply choose your jello based on the colors you’re trying to create and you’ve got yourself a perfectly pretty cookie platter.


LET’S MAKE JELLO SNICKERDOODLE COOKIES

Print This Recipe
Jello Snickerdoodle Cookies

Prep time:  30 mins

Cook time:  15 mins

Total time:  45 mins

Serves: Approx 6 dozen

Classic Snickerdoodles with a springtime fruity twist.
Ingredients
  • 3 cups flour
  • ½ cup sugar
  • ½ cup brown sugar
  • 2 eggs
  • 2 tsp vanilla
  • ½ tsp salt
  • 1 tsp baking soda
  • 1 cup (2 sticks) softened butter
  • ½ tsp cream of tartar
  • Flavored Gelatin (Jello) - I made 5 different colors/flavors. I used about 1.5 oz for every 8 oz of cookie dough, but I'll explain that more in a minute.

  • Cinnamon Sugar Topping:
  • ⅓ cup sugar
  • 3 tsp cinnamon
  • Adjust to taste if you prefer
Instructions
  1. Combine butter, sugars, salt, soda and cream of tartar in a large mixing bowl.
  2. Add eggs and vanilla. Mix well.
  3. Stir in flour and mix until well combined and dough forms.
  4. Separate the dough into equal balls. This is were I got a little complicated. I made 5 colors and each ball of dough ended up being just barely over 8 oz. Yes, I measured it out on my kitchen scale. You don't have to be as precise, but it will make your flavors more consistent in strength as well as keeping each flavor close to the same number of cookies if you do measure it out. For each 8 oz ball of dough I ended up using 1.5 oz of gelatin powder. You could easily use 1 oz and the flavor would still be strong enough (although the color probably wouldn't be as bright).
  5. Mix the gelatin in to each ball. I just put the dough back in my KitchenAid and mixed it until the gelatin powder was combined with the dough. Then I kneaded the dough by hand to get the color mixed evenly. It didn't take much kneading.
  6. Roll dough into 1 inch balls and roll the tops in cinnamon sugar topping. Place on an ungreased cookie sheet.
  7. Preheat oven to 300F and bake for 12-15 mins. Mine were perfect at 13 mins.
  8. Remove from oven and cool 2-4 minutes before moving to a cooling rack to cool completely.
3.5.3226

Store in an airtight container.  Yields approximately 6 dozen cookies (I got about 15 cookies of each color, just FYI.)


This post was written by Krista and originally appeared on While He Was Napping. 

April 29, 2014 by Krista

{Eat, Drink and Be Mary} Bacon Pancake Dippers

Today, I’d like you to meet Mary!  She’s here to share a fantastic recipe that the kiddos will love and is super easy.  We tried this recipe after Mary sent it to me and it’s a winner here.  Plus, it’s harder for my kids to just eat bacon when the pancake is attached to it!  Score!  So, here’s Mary:

_________________________


Hey y’all I’m so glad to be taking over for Krista today, while she gets used to being a new momma, again.  I’m Mary, the girl behind, Eat Drink & Be Mary.  You can often find me raving about a recipe I recently tried, an outfit I got a great deal on, or just a hodge podge of what’s on my mind lately.
So today I thought it’d be appropriate to share a recipe that your kids will love, considering I am taking over for a new (again) momma and all.  And not only love, but they’ll have fun eating it too.  And it’s super easy for you mommas to make, or if you’re like me–a 22 year old, who is still a child at heart.
My goal for this recipe?  An easy meal for momma, and a fun meal for kids.  What kid doesn’t love bacon and pancakes, and combining the two to make a finger food they can dip…sounds like a winner to me!  Plus with mother’s day & father’s day coming up (both in less than 2 months; they’ll be here before you know it) these will make for a fun breakfast-in-bed meal where the kids can get it on all the fun.  So without further adieu…

Bacon Pancake Dippers
idea for the recipe came from Pinterest

What you need:
+ Bacon
+ Bisquick
+ Milk
+ Eggs
+ Syrup
+Cookie Sheet, Wire Rack & Tin Foil

What to do:
+ Cook the bacon.  I took a cookie sheet, covered it in tin foil, and placed a wire rack on top of the tin foil.  This just makes for an easier clean up, and the bacon doesn’t sit in all that grease the entire time it’s cooking.  I cooked the bacon in the oven for 20 minutes on 350.  You can cook the bacon in the microwave, but this was just an easier way for me to do it & an easier clean up.


+ Make the pancake mix.  I went for another easy route and simply made Bisquick pancakes, quick & easy is the goal right? I poured the mix into a measuring cup to help with pouring but a squeeze bottle would work well too.


+ Place the bacon in a pan, on low heat, pour pancake mix over them.  Flip like you would for normal pancakes (1-2 min.)

*Break the bacon in half (no longer than 4 inches) because unless you are a master flipper your dippers will turn out looking like the picture below.  Hey you win some, you lose some.  But after my second attempt, with smaller bacon strips, I’d consider it a win.

+Serve on plate, with syrup to dip in.  That’s it, it’s that simple.

Looking for more recipes, drop my little space in blog land.  Here are a few of my favorites:

                              Pumpkin French Toast Bake   |   Gorilla Bread

_________________________
Thanks for sharing with us, Mary.  Make sure you hop on over to Eat, Drink and Be Mary so you can check out all the other great things Mary is up to!


This post was written by Krista and originally appeared on While He Was Napping.


April 24, 2014 by Krista

{Mama Knows Nest} Safely Cleaning Your Home

How many of you have kiddos in your home?  Raise your hands, raise ’em high.  That’s what I thought.  Have you ever worried about the chemicals in cleaning products?  I hadn’t ever really thought much about it until one day when Big J wasn’t so big.  I had just finished loading the dishwasher and grabbed the multi-surface cleaner and sponge to wipe off the counter top and sink.  Big J was in a sling, facing outward, right at counter height.  These were tall counters and I am not, so they hit me right below my rib cage.  Big J stuck out his tongue and licked the counter.  I knew from the big ole slobber mark on my counter top.  He was pretty little (7 or 8 months maybe) and wasn’t deliberately trying to lick the counter but he did.  I stopped cleaning, hesitant to spray the surface cleaner on something my kid was apparently going to lick.  In fact, he did the same thing at lunch today when he spilled some peach juice on the table.  Surface cleaner was not really something I wanted him to ingest… that was the day I switched to a vinegar and lemon water cleanser.

Leah from Mama Knows Nest is here today to share some of her safe cleaning tips.  That way you won’t have to worry when your kid licks the counter…

____________________________

When I found out I was pregnant, I became more concerned with what I put in my body and what I surrounded myself with because I learned that many babies are born with hundreds toxic chemicals in their umbilical cord blood. Hundreds! In this article, you will find information about a study done on the cord blood of several babies. They found over 200 toxic chemicals in the umbilical cord blood of the babies they examined. When I found out about this I was afraid to use the cleaning products I had because I would be breathing toxic fumes, but I honestly didn’t know what to do about it. So I simply wore a mask when cleaning. Did that help? I have no idea, but it made me feel better.

natural cleaning products

My mother-in-law and even my own mother are into their own holistic ways, but I never really gave much thought to my own household. Once our daughter was born that changed and it became even more important to me. From the type of baby wipes, to the type of baby wash and cleaner I used to wipe off her toys, high chair, etc. I wanted to use all natural, organic cleaners. I even pitched my Swiffer and bought a steam cleaner for our hard wood floors because I didn’t want our little girl crawling around on a floor that was cleaned with harsh chemicals.

It’s scary becoming a mother for the first time. There are so many things to worry about and you want to do everything right. In my 2 short years of being a mom I’ve learned that you just have to do the best you can. One way that I am doing that is by raising Lana in the best natural environment that I can. I want to protect her, and the rest of my family from exposure to carcinogens that are known to exist in some of the most popular household cleaners (like Windex, Lysol, Comet, Scrubbing Bubbles, and Bleach).

A year ago I decided to make the switch to all natural cleaning products for our entire household. Cleaning the floors naturally was a start, but would that really make a difference if I used harsh chemicals everywhere else in our home? It was at that time that I learned about Shaklee (a company founded 60 years ago that is the #1 natural nutrition company in the United States) and their nontoxic household cleaners.

This was a portion of my cleaning product stash before Shaklee.

There are lots of reasons why cleaning with natural cleaners is so important, but here are just a few…

Source (a wonderful and informative blog by the way): www.amybayliss.com

Commercial cleaners contain toxic substances like phenol, formaldehyde, phosphates, ammonia, chlorine bleach, arsenic, naphthalene, hydrochloric acid, paradichlorbenzene, lye, phosphoric acid, and sulfuric acid, just to name a few. When breathed in, these substances can irritate the entire respiratory system. The chemicals are then leached into your blood stream leaving traces in other organs including your heart. Petroleum based cleaners are directly absorbed into the skin. The long term effects of these chemicals are not good. Some are carcinogens (cancer causing).

Some of these cleaners release volatile organic compounds (VOCs), making the air inside of your home toxic. In fact, studies conducted by the Environmental Protection Agency’s Total Exposure Assessment Methodology (TEAM) found the levels of about 12 common organic pollutants to be two to five times higher inside your home than outside. Even worse, these contaminants may persist indoors long after using a product. The Cancer Prevention Coalition lists hundreds of toxic and deadly chemicals that are in household cleaners. Here is another informative test by an independent company: Cleaning Chemicals and Their Impact on Indoor Environments and Health.

We can’t assume that products are safe just because they are widely available and for sale. Cigarettes are sold and yet we know the effects they have on the body. They are proven cancer causers. The New York Times has reported several times about the fact that the US allows the sale of toxic and dangerous products that other countries prohibit. Here is just one such article where formaldehyde laden wood was sold in the US: US Rules Allows the Sale of Products Other Countries Ban.

Shaklee has a few starter kits for people looking to try out their products. I decided to purchase the Get Clean® Starter Kit for $99. It seems like a large investment for household cleaners, but you get a TON of products and what is even better is they last FOREVER! You can see an example of just how long the cleaner lasts below. You would spend $3400 for ready to use cleaners to get the same amount of clean found in the Get Clean Starter Kit! So I figured heck, why not!?

As you can see, your money goes a long way with this kit because it is filled with a ton of products.

This is my bottle of Basic H that I started using at the end of October 2012. Granted we lived with my parents for a month while purchasing our new home, but as you can see it really does last a long, long time! It’s a concentrated solution that you mix with water. Each spray bottle is designed with instructions on just how much Basic H and water you need. It’s awesome and easy!

The Get Clean Starter Kit contains:

  • Basic H2® Organic Super Cleaning Concentrate, 16 oz.
  • Germ Off Disinfecting Wipes, 35 Wipes
  • Nature Bright® Laundry Booster and Stain Remover, 32 oz.
  • Dish Wash Concentrate, 16 oz.
  • Dish Washer Automatic Concentrate, 32 oz.
  • Fresh Laundry Concentrate HE Compatible, Regular Scent 32 oz. (Liquid)
  • Soft Fabric Dryer Sheets, 80 sheets
  • Dish Washer Automatic Concentrate Dispenser (empty)
  • Nature Bright® Dispenser (empty)

Including all the accessories you need to get really clean:

  • Organizer Caddy
  • Spray Bottles (3) for Windows and Mirrors, All-Purpose, and Degreasing
  • Dropper Pipette
  • 1/4 oz. Dispenser Pump for 32 oz. Bottle
  • Laundry Measuring cup
  • Dual Measuring Spoon
  • Super Microfiber Cleaning Cloth
  • Super Microfiber Window Cloth
  • Super Microfiber Dish Sponge
  • Miracle Scrubber Pad

Not only am I providing a safer environment for my family, I am saving a TON of money!

Click below to get your own clean kit!

 photo FollowonFB_zpsf6a4ac9c.jpg

 photo ScreenShot2013-10-15at125108AM_zps6ecdd371.png
____________________________

Thank you for sharing with us today, Leah!  I definitely think it is worth knowing about all the options out there, especially when it comes to your family’s safety.  I’ve never used the Shaklee products but have heard good things about them.  I do make a lot of my own cleaning products from natural ingredients and I like knowing exactly what is in them.  That way I know just what is entering my children’s bodies when they lick the counters and if I need to call poison control or not…  Check out Leah’s awesome blog, Mama Knows Nest!

This post was written by Krista and originally appeared on While He Was Napping.


  • « Previous Page
  • 1
  • …
  • 62
  • 63
  • 64
  • 65
  • 66
  • …
  • 231
  • Next Page »

I'm Krista. Ringleader here on While He Was Napping, wife to my handsome Mr. Right & momma to my THREE energetic boys, Big J (9), Little J (6) & Little N (4). We FINALLY added a beautiful little girl to our family last December.

I’m knee-deep in Tonka trucks & Thomas trains. I survive our crazy days with Vanilla Coke, Sonic slushies, sweet snuggles and little giggles. When I tuck them in tight & kiss them good night, I get a little time to create & just be me.


It all happened
while (s)he was napping
Want More of My Story?

Privacy Policy

While He Was Napping respects your privacy and is committed to keeping any personal information collected on this website confidential. To find out what information we collect and how it is used or what options you have regarding your information, see our full privacy policy here. Creative Commons License The website found at whilehewasnapping.com and all subdomainsauthored and published by Krista is licensed under a Creative Commons Attribution-NonCommercial-NoDerivs 3.0 Unported License.

Pretty Chic Theme By: Pretty Darn Cute Design