While He Was Napping

momma gets stuff done

  • Home
  • About
  • Archive
  • Do It Yourself
    • Crafts
      • No Sew
      • Painting
      • Paper Crafts
      • Repurpose Projects
      • Vinyl
      • Washi Tape
      • Kid’s Crafts
      • Fonts
    • Sewing
    • Decorate
      • Home Decor
      • Holiday Decor
    • Celebrate
      • DIY Gifts
      • DIY Your Party
  • Recipes
    • Beverages
    • Appetizer
      • Bread
      • Other Appetizers
    • Snacks
    • Main Dish
      • Meat
        • Chicken
        • Beef
        • Pork
        • Seafood
      • Vegetarian
      • Slow Cooker
      • 30 Minute Meals
    • Dips & Sauces
    • Salads
    • Pasta
    • Soup
    • Dessert
      • Cookies
      • Brownies
      • Cupcakes and Cake
      • Box Mix Recipes
      • Other Sweet Treats
    • Breakfast Food
      • Pancakes
      • Waffles
      • Muffins
      • Other Breakfast Food
  • Family
    • Babies
      • Pregnancy
      • Newborns
      • The 1st Year
    • Toddlers
    • Preschoolers
    • Kindergartners
    • 6-8 Year Olds
    • The Grown Ups
      • Date Night
      • Romantic Gifts
    • Self Care
  • For the Home
    • Cleaning
    • Organizing
    • Emergency Preparedness
  • Travel
    • Travel Tricks & Tips
    • Traveling with Kids
  • Tech & Gadgets
    • Must-Have Apps
    • Techy Home Appliances
    • Gadgets & Electronics
    • Blogging Tips
  • Printables
    • Posters
      • Quote Printables
      • Subway Art Printables
    • Printable Organizers
    • Printable Journals
    • Learning Printables & Worksheets
    • LDS Printables
  • Holidays
    • New Year’s
    • Valentine’s Day
    • St. Patrick’s Day
    • Easter
    • Cinco de Mayo
    • Mother’s Day
    • Father’s Day
    • 4th of July
    • Back to School
    • Halloween
    • Thanksgiving
    • Christmas
    • Holiday & Seasonal Printables

January 28, 2019 by Krista

DIY Scratch Off Cards that will Spice Up Date Night

Hi there! Are you looking for a fun way to spice up your love life that won’t break the bank? Or maybe you’re searching for a fun DIY gift? Do you ever play the “Well, whatcha wanna do?” game on date night? Do you love scratch off cards – or maybe know someone who does? Then these DIY scratch off cards are just what you are looking for!

In just 8 super easy steps and an afternoon, you’ll create a one-of-a-kind set of DIY scratch off cards that will add a little fun and mystery to date night. They are perfect for romantic gifts or just for a little change of pace.

DIY Scratch Off Cards Romance on a Budget


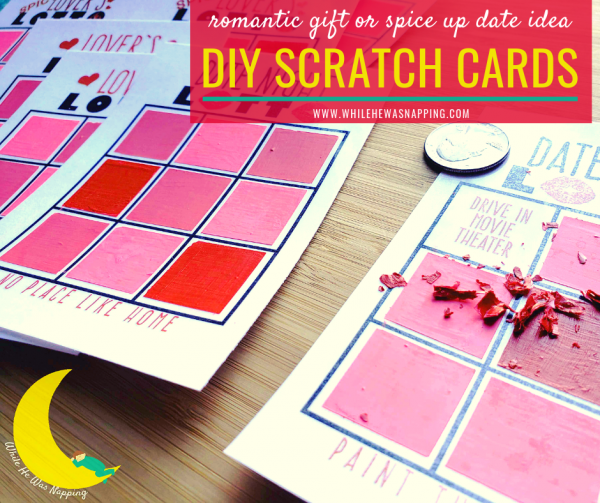
DIY SCRATCH OFF CARDS: SPICE UP DATE NIGHT WITH A LITTLE FUN AND MYSTERY

The best part about these DIY scratch off cards are that you can customize them to fit your needs. If date night has become predictable and lost it’s excitement, then something like a Date Night Lotto card would liven things up! Scratch off a square and you have a great date idea without adding a ton of stress or prep to date nights!

Or maybe you’re looking for a way to reconnect with your sweetie or to spice things up in the bedroom a bit? Then a set of Lover’s Lotto or Spicy Lover’s Lotto cards might fill your needs best. Scratch off one of those squares and forget your boring, old routine! Right at your finger tips is a great new romantic idea to fill your evening!

And I’ll give you the blank templates in just a minute! Doesn’t get much easier than that!

(But, if you do want it to get easier, I have pre-filled, ready-to-print cards as well as an editable PDF you can just plug your own ideas into in my Etsy Shop.)


ARE DIY SCRATCH OFF CARDS YOUR KIND OF PROJECT?

This project is pretty simple, but it’s not for everyone. So, how do you know if it’s the kind of thing you’re looking for? Who is this post written for? What demographics will benefit from this information? Make an emotional connection and hit a pain point.

  • Do you enjoy a good, simple DIY project?
  • Are you looking for a way to liven up your love life?
  • Do you need a romantic gift idea that doesn’t cost a lot, doesn’t take a ton of time to put together and is something your gift receiver will love?
  • Are you trying to stick to a budget?

If you said yes to those – or any combination of those – then this project is exactly what you’re looking for.


However, if you’re looking for something RIGHT NOW or don’t like DIY projects this might not be what you’re looking for. (My printable Date Night Jar or printable Truth or Dare: Couple’s Edition bedroom card game might fit your needs better right now. They are literally print and cut and done.)

Date Night Lotto DIY Scratch Off Cards


HOW TO MAKE DIY SCRATCH OFF LOTTO CARDS

With just a few simple supplies and an afternoon, you’ll have custom DIY scratch off cards perfect for your needs. A quick print job, some trimming and laminating, and a splash of paint is all you need to get one step closer to a spicier love life.

And don’t worry, most of the project time is waiting for the paint to dry. While it will take a few hours for your DIY scratch off cards to be all ready to go, you don’t need to carve out a whole afternoon to spend slaving away.

DIY SCRATCH OFF CARD SUPPLIES:

  • Blank scratch off card templates – Print your free blank templates HERE or you can grab all the pre-filled, ready-to-print cards and the editable PDF files to fill in yourself RIGHT HERE)
  • Printer and Paper
  • Scissors or paper cutter
  • Clear contact paper, cold laminating pouches or a thermal laminator and thermal pouches (I absolutely LOVE this thermal laminator starter kit – works great and totally affordable. I have the older model and it still works like a charm.)
  • Acrylic paint and paintbrush – any color will work, but a metallic paint will look most like a typical scratch off card. Follow your colorful heart, there is no wrong choice.
  • Paint palette or something to mix your paint on
  • Dish soap – the kind you hand wash dishes with, not the kind you put in the dishwasher.
  • Skinny 3mm washi tape – optional

DIY Scratch Off Cards made with simple supplies


PRINT & FILL IN YOUR DIY SCRATCH OFF TEMPLATES

Step #1: Download and print your blank lotto card templates. I recommend printing with a laser printer and on card stock for durability. Ink jet and regular paper will work just fine though.

*If you choose to grab my editable PDF files from my Etsy shop, you’ll want to fill those in before you print them.

Step #2: Fill in the blank templates with a pen or marker. Leave some space around your writing to make sure it won’t stick out from under the paint when you cover them up. You don’t need to leave a lot of space, but try not to write all the way to the borders of the boxes.

DIY Scratch Off Date Night Cards


COVER AND CUT YOUR DIY SCRATCH OFF CARDS

*If you use laminating pouches or a thermal laminator, you will want to switch steps #3 and #4. Cut the cards apart first and then laminate each individual card. After each card is laminated, cut it apart and trim the cards, if desired.*

Step #3: Cover the front of your lotto card templates with the clear contact paper. You can cover the back too, if you want, but it’s not necessary. This cover will help protect the cards and is how the paint will scratch off your DIY scratch off cards.

Step #4: After the contact paper is on the cards, cut the cards apart. The files are formatted to cut an 8.5″x11″ paper into quarters. You absolutely can cut the cards smaller though. I did trim mine smaller for neater edges and smaller margins.

DIY Scratch Off Cards DIY Gift Idea


PREPARE YOUR DIY SCRATCH OFF CARDS FOR PAINTING

Step #5: If you choose, mask off the edges of the cards. 3mm washi tape is perfect for this! Just put a line of tape on all the grid lines on the card. It’ll keep your paint lines nicer. Repeat with each card.

Step #6: Mix your acrylic paint and dish soap with an approximate 2:1 ratio – 2 parts paint, 1 part dish soap. It’s not rocket science and you don’t have to have precise measurements for this to work, so don’t stress over it.

DIY Scratch Off Cards


PAINTING YOUR DIY SCRATCH OFF CARDS

Step #7: Apply a thin layer of paint over the words on your card. Let the paint dry thoroughly.

Step #8: Repeat step #7 until you can no longer see the text through the paint. Depending on what color paint you use, you may need 3-5 coats. Let dry overnight once you can no longer see text through the paint layers.

DIY Scratch Off Cards with Acrylic Paint

That’s it, your ready to spice things up!


DIY SCRATCH OFF CARD TIPS & TRICKS

** A laser printer will keep your ink from smudging, should the cards get wet. Using laminating pouches will also accomplish this. An ink jet printer will work just fine, just be cautious not to get the cards wet if you don’t laminate them with pouches.

** Skinny 3mm washi tape is perfect for masking off your grid lines while you paint, however it is NOT a necessity. It will keep your paint lines neater, make painting easier, and make your cards look better overall, but free-handing the painting process is definitely an option and will save some time if you don’t have to mask off your grid lines. You could also cut down and use masking tape or scotch tape, if you prefer.

** Use fresh paint. By that, I mean not paint you’ve had in a cupboard for a few years… As you can see in that last photo, I started using silver paint. But it was old. It was clumpy and kept separating and didn’t mix well with the dish soap, so I ditched it for the red and pink paints. Newer, non-clumpy paint will give you a much better result with far fewer coats of paint.

** The painting and waiting to dry process is the longest part of this project, but it will turn out so much better if you do thin layers rather than a thick, globby one. You can use a blow dryer on low heat, low air flow to speed this process up.

** If all this masking off and painting thing is more than you want to deal with, you can use scratch off stickers to cover your date ideas instead. Take this cute idea and simplify! Find scratch off stickers on Etsy or on Amazon.

Got more questions? You’re always welcome to leave a comment or shoot me a message!


Romantic DIY Scratch Off Cards


READY TO MAKE SOME DIY SCRATCH OFF CARDS AND SPICE UP YOUR LOVE LIFE?

In just an afternoon you can spice up date night and add some fun and mystery to your romantic life. This project is simple and fun. It’s a great romantic gift idea that is customizable to fit your exact needs. And who wouldn’t love to get some DIY Scratch Off Cards like these?!

Turn on some mood music, grab a coin and start scratching off those fun ideas!

Spice up Date Night with DIY Scratch Off Cards


If you want more romantic gift and date night ideas, check out the Date Night Jar (or HERE is a printable version!)

October 31, 2016 by Krista

Wooden Halloween Candy Corn Decorations You’ll Want to Eat!

Halloween decorations. It seems like it’s an all or nothing deal. Either we go all out and spook out the whole house or we don’t even so much as put up wreath or change the chalkboard quote. I am definitely in the latter of those two groups. Clearly, right? I’ve got two wooden candy corn decorations and that’s about all the decorating I’ve done for Halloween this year. Halloween is hard for me to decorate for because I know it’s the kick-off to what is always a CRAZY holiday season. I tend to skip Halloween because I’m trying to get ahead of Thanksgiving and Christmas. Halloween ends of being a rushed afterthought.

Enter these candy corn decorations. This project piggybacks off another one that is coming next month and I just happened to have these two extra pieces that I thought would look good as candy corn decorations, so they are last-minute.

WOODEN HALLOWEEN CANDY CORN

 DECORATIONS

Wooden Candy Corn Halloween Decorations


Materials:

  • 1″x6″ board
  • Tape measure or ruler
  • Pencil
  • Sand paper
  • Masking tape
  • White acrylic paint
  • Orange acrylic paint
  • Yellow acrylic paint
  • Paintbrush
  • Circular saw or other saw

Directions:

1. Use the tape measure or ruler and, on the top edge of the board, measure 2.5 inches from the end of the board. Make a small mark with the pencil.

Halloween | Decor | Decorations | Candy Corn | Wood

2. Move the tape measure to the bottom edge of the board, and measure 1.25 inches. Make a mark with the pencil.

Halloween | Decor | Decorations | Candy Corn | Wood

3. Use the straight edge of the ruler and line up the bottom mark with the top corner of the board. Draw a line to connect the two marks. Do the same from the bottom mark to the mark at the top.

Halloween | Decor | Decorations | Candy Corn | Wood

4. Repeat the measurements for the remaining length of the board. Use the saw to cut along your marks.

Halloween | Decor | Decorations | Candy Corn | Wood

5. Use the sand paper to clean up the edges of each of the triangles. A rougher grit will take the edges down more than a finer grit paper.

Halloween | Decor | Decorations | Candy Corn | Wood

6. Use your masking tape to tape off the middle section of each triangle so your paint won’t bleed into the other sections. You can measure the sections, but I just free handed and eyeballed it on mine.

Halloween | Decor | Decorations | Candy Corn | Wood

7. Paint the top section of each triangle white and allow to dry for 20-45 minutes. Continue to add coats of paint so the wood is adequately covered.

8. Paint the bottom section yellow on each triangle. Allow to dry for at least 20-45 minutes. Repeat and continue to apply thin coats of paint until you have adequately covered the wood.

9. Remove the masking tape when the paint is completely dry. Wait at least 2-4 hours, or overnight if possible so you don’t have any paint bleed or smudging.

Halloween | Decor | Decorations | Candy Corn | Wood

10. Paint the middle section orange. You can tape it off if desired, but I just free handed it carefully. Candy corn lines aren’t perfectly straight in reality, so I wanted mine to be unperfect too.

11. Allow the paint to dry overnight so you can set them out to display.

Halloween | Decor | Decorations | Candy Corn | Wood

May 11, 2016 by Krista

Egg Throw Painting

This shop has been compensated by Collective Bias, Inc. and its advertiser. All opinions are mine alone. #allEssentials #CollectiveBias

WELCOME! I’m so glad you’re here!

Do you let your kids be kids, even when they get messy and their clothes get dirty? Do you have the confidence that you’ll be able to get those clothes clean again?

With three boys in our house, things get messy. In fact, things are pretty much always messy. There’s an endless supply of dirty dishes, toys on the floor and the laundry… oh, the laundry. There’s so much laundry. And these aren’t just dirty clothes, they are rough-and-tumble, explore-the-world, stains-on-everything kind of dirty.

But it’s important to me for my kids to have the chance to explore and have adventures. This world is so amazing and I want my kids to discover that. I want them to play with bugs and make mud pies and climb rocks and trees.

I need a laundry detergent that can keep up with my family. I know that my kids can play and explore and I can handle any stains they might pick up on their adventures.

And that’s where all® Fresh Clean Essentials™ Fragrance Free comes into play in our house. This new detergent is sulfate free and gives a powerful clean without the harshness. I love to use sulfate free shampoos – they leave my hair feeling clean and strong. I knew I had to try this detergent on the adventures that my boys wear on their clothes. I love that my boys can be rough and tumble kids and I can let all® Essentials™ worry about getting their clothes clean again!

all® Fresh Clean Essentials Egg Throw Painting all fresh clean essentials detergent

With my active boys, I have to find active and creative ways to get them to practice learning games. Little N is starting to learn colors and it’s good review for Little J too. And we couldn’t leave Big J out of all the fun. Because throwing eggs is naughty and sometimes it’s fun to be naughty!

EGG THROW PAINTING

all® Fresh Clean Essentials Egg Throw Painting

Materials:
– 12 eggs
– Pair of scissors
– bottle with a narrow neck
– toothpick
– container for the eggs
– paint (I like to use washable paint, because, well I’m not completely crazy)
– canvas or poster boards
– plastic drop cloths for super easy clean up

Directions:
1. Empty the eggs by poking a hole approximately the size of a dime in one end of the egg with the tip of the scissors. Gently tap the scissors on the egg until it breaks. Use your finger to clean the cracked egg shell out of the hole. If the membrane in the egg didn’t break, pierce it with a toothpick.

all® Fresh Clean Essentials Egg Throw Painting Egg Prep Top


2. Tip the egg so it sits on the mouth of the bottle with the hole pointed down into the bottle.

3. Gently tap a hole in the other side of the egg. This doesn’t need to be a big hole, but you do need to break the membrane.

all® Fresh Clean Essentials Egg Throw Painting Egg Prep Bottom


4. Blow into the hole you just made in the egg to push the egg yolk and white into the bottle.

5. Wash out the egg shell and set it to dry in the carton. You don’t have to let the shells dry, but your paint will be a little runnier if you don’t.

all® Fresh Clean Essentials Egg Throw Painting Eggs Prepped


6. Fill the eggs with a tablespoon or more of paint. The more paint, the bigger the splatter and the cooler the effect. Also, the bigger the mess. But it’s super easy to clean up. I suggest washable paint, just to make things easier.

all® Fresh Clean Essentials Egg Throw Painting Eggs and Paint


7. Lay the plastic drop cloths out over your work area. I definitely suggest doing this outside, but if you’re super brave you can try it in the shower. Or the garage maybe. It would be pretty easy to clean it up in either of those spots.

all® Fresh Clean Essentials Egg Throw Painting Aftermath


*Optional Step: you can let your kids put stickers or spell out their name with tape on the canvas. After they throw their eggs and the paint dries, remove the stickers or tape and you’re left with some cool negative space art.

8. Set the canvases or posters up on the drop cloth. I found that hanging the drop cloth on the fence and then setting the canvases up against the fence worked out well. You can lay them flat too. The paint will have more of a splatter pattern without the drips. This is good if you have a little one that isn’t very consistent with throwing yet. They can drop the eggs instead. The biggest thing is to make sure there is something solid behind your canvases.

all® Fresh Clean Essentials Egg Throw Painting Eggs The Wind Up


9. We did this one at a time, because I was trying to get photos, but it would’ve been more fun to do it all at once. Pandemonium is fun, right?! You’ll want your kids to stand close enough to hit their canvas each time they throw an egg. We found the eggs were actually much harder to break than expected. Which meant we could throw each egg multiple times, and that was fun.

all® Fresh Clean Essentials Egg Throw Painting Eggs Action Shot


10. Let your kids throw the paint-filled eggs at their canvas. We used a dozen eggs and each boy got 4 eggs. You can let them use a paint brush (or their fingers!) after they’ve thrown their eggs to finish off their masterpiece if they want.

all® Fresh Clean Essentials Egg Throw Painting Eggs TheFinishing Touches

11. Let the paint dry. Display your little painters’ works of art.

Clean up is as simple as throwing the drop cloth in the trash and a load of laundry in the washer.

all® Fresh Clean Essentials Egg Throw Painting CleanUp


I love knowing that with all® Fresh Clean Essentials™, my kids and I can do these messy projects together. And it’s super easy to get it online at Walmart.com! I can focus on having fun and being in the moment, not worrying about if I’m going to be able to get their laundry clean. And I’d much rather make memories than worries.

all® Fresh Clean Essentials Egg Throw Painting all detergent


Check out more fun ways to let your kids be kids and get their clothes clean again with all® Fresh Clean Essentials™.

October 27, 2015 by Krista

Directional Halloween Sign with BEHR® Marquee Paint

I want to thank Behr for sponsoring this post. I was provided with compensation for products used and my time to share this project. All content is original and honest, pinky promise!

Growing up, my family didn’t celebrate Halloween much.  I remember trick-or-treating maybe a handful of times and we attended a few carnivals and Halloween parties.  But, my mom doesn’t like Halloween.  And I get that.  Well, I kinda get that.  The gore and guts, no thanks.  No thanks at all.  I like the cutesy, fun part of Halloween.  And decorating with the cutesy, fun side of Halloween makes me happy.  It’s the kick off to the holiday season!  So I put together a fun Halloween project that turned out fabulously, thanks to BEHR® MARQUEE® Interior Paint & Primer!

DIRECTIONAL HALLOWEEN SIGN

Behr Marquee Halloween Directional Sign


MATERIALS

– 8 ft long 1″x6″ pine board
– 6 ft long 1″x4″ pine board
– Pencil
– Square box or other square to use as a template to make your arrows
– Tape measure
– Jig saw and saw blades
– Belt Sander and/or Sandpaper
– BEHR MARQUEE paint samples in:

  • Torch Red
  • Birthstone
  • Green Dynasty
  • Lamplit
  • Teal Motif
    Behr Marquee Halloween Sign Interior Paint Products

– BEHR PREMIUM PLUS ULTRA® Interior Paint & Primer In One in Black (I would’ve gotten this in MARQUEE as well, but the hardware store couldn’t mix the color I needed with MARQUEE.  The PREMIUM PLUS ULTRA was a great paint too.)
– Paint brushes or foam rollers (I used rollers and foam brushes)
– Newspaper or other covering to protect your work surface
– 1 1/4″ screws
– 3/32″ drill bit
– drill and screwdriver
– black vinyl
– craft cutter or craft knife
– masking tape or transfer tape
– blunt object to press down vinyl
– Polyurethane to seal boards


DIRECTIONS

MARKING THE BOARDS FOR THE HALLOWEEN SIGN

– Use the square box or other square to create arrows on the board.  Line up the point of your box in the middle of the board.  Mark the point of the box to create the point of the arrow.
Behr Marquee Halloween Sign Mark Board for Cutting
– Decide how long you want your arrows to be.  I made mine all different lengths: 12 inches, 16 inches, 18 inches, 20 inches, and 24 inches.  There was a little left over at the end of my board.  Measure and mark all your arrows with the box and the pencil.
Behr Marquee Halloween Sign Mark Board for Cutting Arrows

CUTTING THE BOARDS FOR THE HALLOWEEN SIGN

– Use the jig saw to cut the boards apart.  I let Mr. Napping do this part for me, as I hadn’t ever used the jig saw before and we were on a time limit; he was leaving on a work trip.  I didn’t want to end up missing fingers because of a lack of experience and familiarity.  Be sure to brace the board while you cut.
Behr Marquee Halloween Sign Cut the Board Arrows
– After you have all your arrows cut out, sand the wood until it’s smooth.  We used a belt sander for the majority of the sanding and then I did some touch up with sandpaper before I put on a coat of paint.  Don’t skip the sanding, your paint will turn out so much better if you take the time to prep your boards.
Behr Marquee Halloween Sign Sand the Boards


PAINTING THE BOARDS FOR THE HALLOWEEN SIGN

– Paint each board one of the five colors of the MARQUEE colors.  That’s right, no primer! The MARQUEE collection of paint has a One-Coat coverage guarantee over previously coated surfaces when tinted to any of the 372 colors in the MARQUEE Interior One-Coat Color Collection and applied to previously painted surfaces.  I was very impressed with the coverage even though the boards were not previously coated.  And not having to wait for a primer to dry was fabulous. My least favorite part about painting projects is all the waiting time between coats of paint.  The MARQUEE paint covered my project well and dried fast, which made me a happy momma because it meant I didn’t have a paint project on my kitchen counter for a week before it was completed.  There is also exterior paint available in the MARQUEE line which has some great weather-resistant properties.  If you’re new to painting, Behr has some great directions on how to correctly choose supplies, prepare and prime before you paint.

Behr Marquee Halloween Sign Paint the arrows

– Let the paint dry for a minimum of two hours.  Sand lightly with fine grit sand paper.  This mostly just removes any weird brush strokes or paint puddles that may have gathered and dried during that first coat so your next coat doesn’t just add to the weirdness.
Behr Marquee Halloween Sign Single Coat of Paint
– Paint another coat of paint on each board.  Let dry a minimum of two hours.
– Paint the 6-foot pine board with the black paint.  Let dry and set aside for now.
Behr Marquee Halloween Sign Paint Support Board


APPLYING THE VINYL FOR THE HALLOWEEN SIGN

– Cut out of black vinyl any text and graphics you want to use on your signs with a craft cutter or a craft knife.  I used my craft cutter for my signs.  You can find the links to the jpg files I used to cut from here: TEXT and GRAPHICS.  The files are formatted to 12×12 inches, as that is what fit my cutter.  You can alter the images as you need to fit the dimensions you have available.
Behr Marquee Road Signs Images Behr Marquee Road Signs Text
– Weed out all the negative space from your vinyl and discard it.  I prefer to use masking tape to transfer vinyl, rather than transfer tape.  To do so, place a layer of tape over the image either from top to bottom or bottom to top until it’s covered with tape.  I find it easier to get the vinyl to stick when I’m only pulling off a small layer of tape at a time – and masking tape is usually less sticky than transfer tape, so there’s never any gooey residue left behind.  Use whatever you prefer to transfer vinyl for this part.
– Place the vinyl on the board you choose and begin removing the masking tape a layer at a time.  If the vinyl pulls back up, replace the tape and rub firmly with a blunt object (the handle of a butter knife or scissor handles work well).  Then, pull the tape up again.  It works best if you pull the tape back at a 180-degree angle.
– When the tape is removed from the vinyl, rub the vinyl down firmly with the blunt object.
– Repeat the vinyl transfer process with each board.
Behr Marquee Halloween Sign Applying Vinyl with Masking Tape

SEALING THE BOARDS FOR THE HALLOWEEN SIGN

– Apply a thin layer of Polyurethane to each board.  I intend to use this sign indoors and only applied a single coat to the face of the board.  I didn’t seal the edges or the back.  Let dry thoroughly, overnight if possible.  Polyurethane can be a great sealant and protector once it’s dry, but it can bubble if it gets too hot, is applied too quickly or if items are placed on it before it completely dries.  So, let it dry really well.
Behr Marquee Halloween Sign Seal the boards

Behr Marquee Halloween Sign Let Sealant Dry Thoroughly


ASSEMBLING THE SIGN FOR THE HALLOWEEN SIGN

– On the BACK of the black board , lay out the arrows and arrange them however you like.  Mark the placement with your pencil.
Behr Marquee Halloween Sign Layout Sign
– Turn the black board over and drill pilot holes with the drill bit.  You can drill all the way through the black board.  I decided to do two screws in each board so that the boards won’t twist or spin.
Behr Marquee Halloween Sign Mark Board to Attach Arrows
– Once you have the pilot holes drilled, you can position the boards underneath the black board and sink the screws through the black board into the arrow boards.  By working from the back of the sign, your screws will be hidden.  The boards are also thick enough you won’t need to worry about the screws poking through the front of the arrows.
Behr Marquee Halloween Sign Screw Sign Together

Behr Marquee Halloween Sign Attach Arrows to Board

DISPLAYING THE HALLOWEEN SIGN

– This sign will be used at a Halloween party and I’m simply going to set the sign up against a wall in an infrequently trafficked area.  It’s large enough to see, but hopefully it won’t get played with too much.  Because all I really need to complete my day would be my three boys running around with pointy sticks screwed to a really long stick.  It’s like the ultimate sword.  Call the Emergency Room and alert them now.  My younger sister has also asked to borrow the ultimate sword, I mean sign, for decor for a Halloween party she is co-chairing for the all the college kids at church.
Behr Marquee Halloween Directional Sign and Halloween Decor


So, there you have it.  A fun and cutesy Halloween sign.  No guts or gore here.  Skeleton Street is about as close as I’ll get to that.  This seems like a lot of steps, but it’s actually a really easy paint project.  Definitely something you could do in a day or two, tops.
Behr Marquee Halloween Sign and Interior Paint Products

What are you dying to do with BEHR paints?


This post is brought to you by BEHR. Color that’s True to Hue. If you feel it, you can find it. Visit True to Hue. Behr sponsored this blog post. The opinions, photos and text are all mine, honest.

I'm Krista. Ringleader here on While He Was Napping, wife to my handsome Mr. Right & momma to my THREE energetic boys, Big J (9), Little J (6) & Little N (4). We FINALLY added a beautiful little girl to our family last December.

I’m knee-deep in Tonka trucks & Thomas trains. I survive our crazy days with Vanilla Coke, Sonic slushies, sweet snuggles and little giggles. When I tuck them in tight & kiss them good night, I get a little time to create & just be me.


It all happened
while (s)he was napping
Want More of My Story?

Privacy Policy

While He Was Napping respects your privacy and is committed to keeping any personal information collected on this website confidential. To find out what information we collect and how it is used or what options you have regarding your information, see our full privacy policy here. Creative Commons License The website found at whilehewasnapping.com and all subdomainsauthored and published by Krista is licensed under a Creative Commons Attribution-NonCommercial-NoDerivs 3.0 Unported License.

Pretty Chic Theme By: Pretty Darn Cute Design