I’m so in love. With the subway art movement! No worries though, I’m still smitten with My Mr Right, too. I love subway art. It’s all the same idea, but each project is different and unique! The sizes, the colors, the topics, the words, the shapes, the word placement… Ahhh. It’s gorgeous. Well, I had to try my hand at this… so… Here it is:
Fanciful Friday: Homemade, Kid-proof Fridge Magnets
So, my little Monkey LOVES to play with the stuff on the fridge. My mom keeps every paper that enters the house on the fridge. Not the best combination! And not literally every single paper, but there is a lot on that small magnetic box. We cleaned off the fridge within reaching height of The Monkey and let him play with some of the magnets. He loved it. The magnets weren’t special ones, but he terrorized and wrecked them. I decided he needed a little more durable, kid-friendly magnets to play with.
First, I found clip art on the internet of things he likes. You know, boy things… trucks, cars, tractors, dump trucks, bulldozers. That sort of stuff. Actually, I learned a very valuable lesson: When searching images on the internet, search “bulldozer”, NOT “back hoe”! Not the images I was wanting to display on the family refrigerator. Anyway, I copy and pasted them into Word, sized them big enough that he couldn’t swallow them… ’cause he so would if he could, then printed them out on regular white printer paper. Then, I put contact paper on the images and cut them out.
Next, I took a flexible cutting board (found mine at Wal-Mart. Three for like $2 or something.) I took some rough grit sandpaper and roughed up the cutting board. Ok, I admit that I skipped this step on my first go-round… but, the papers kept falling off. Once I roughed it up, the glue stuck better. I just used the cheap Wal-Mart brand boards. I’ve seen them in kind of an almost a clear, see-through sort of color, but the ones I used are just white.
Next, I used Tacky Glue to glue the cut out images to the cutting board. Clean up any excess that squeezes out under the edges. You could probably also use hot glue if you get the edges down quick enough. I laid heavy books on mine until they were good and dry. This is important because they tend to curl if they aren’t dried flat… Also learned from the first try on this project. (Haha, live and learn, right?)
Then, I cut the pieces apart. I left some of the cutting board around the border so they would be a little more durable and water spit proof. I put a line of hot glue on the edges of the papers to help hold them down, but Monkey pulled those off within like two days, so… that step is up to you. Ironically enough, he didn’t eat the hot glue. But, I’ll count my blessings on that one. (Yes, there is a water mark on the image, but I couldn’t find good clip art that didn’t have it… besides, my little Monkey won’t care.)
Fanciful Friday: Baby Quilt
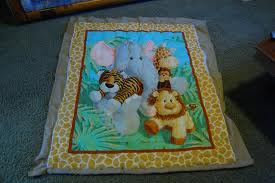
It’s been a while since I actually made this. Just over a year, actually. But I am so proud of it, I had to share. Mostly I’m so proud due to the fact that I did everything for this project in two days, without quilt frames, while I was 7 1/2 months pregnant! It also has given me the incentive to declare that I want to make a quilt for each of my babies. Notice, I said declare. Whether I will still have the time and ability to do so has yet to be seen.
I fell in love with this quilt panel and was rather adamant that I get to make a blanket for the baby with it. My husband, being the smart man he is, knew not to argue too much with his crazy and hormonal pregnant wife. This was not a fight he chose to take on. Smart man. I’d have done it while he was gone on his three week Army training.
I did triple layer the batting. I believe it was Mountain Mist Brand… but that’s about all I remember, sorry. I got it at Jo-Ann. I wanted to have a super fluffy quilt. And I am so glad I did that many layers, it’s the padding in his crib. Crib mattresses are the most uncomfortable things ever! Yes, I have slept on one within the past year. Definitely prefer my memory foam! Sorry, I digress. The flannel backing was long enough that I just folded the edges over the top, tucked the unfinished edge down so it would get caught in the seam and made that my binding. It’s worked out quite well, no problems to speak of.
I measured out my ties. I did them 4″ apart. There is one set that it really close to the edge… If I had measured it out prior I probably would have tried to adjust my ties a little, due to my OCD. But, by the time I was that far along with my project, I didn’t care enough to bother.
See how puffy? That’s what three layers of batting will do… |
Click to enlarge. You’ll get a visual of what I’m talking about with the binding. |
Keep the ties on the back fairly short… safety first and all. |
Linked to these:
Lucky Star Lane
Today’s Creative Blog
Sugar Bee’s Take a Look Tuesday
Letting the Creative Juices Flow
Anything Related
Garden Party Tuesday
Topsy Turvy Tuesdays
Make It Yours
Show and Tell
Whatever Goes Wednesday
Show Us What You’re Working With
Creative Therapy Session
Penny Pinching Party
Fanciful Friday: I Kiss Better Than I Cook
I found this quote shortly after we got married and LOVED it. Mostly because it was so dang true! My cooking skills were not something to be desired… by anyone. They have since improved with much thanks to and help from my wonderful husband, so don’t be afraid to try any of the Tasty Tuesday recipes. They all have my husband’s personal stamp of approval. This quote has a different meaning to us now… it just means that not only has my cooking improved, we’re even better kissers now too. =]
Anyway, I wanted to display this quote in our kitchen but wasn’t exactly sure where. My husband liked the quote too and to put it where I had initially thought was great for me and my vertically challenged self, but not so much for my much taller husband. It ended up above our kitchen sink. The perfect spot for both of us to enjoy it.
If you would like one of your very own to enjoy as well, check out my ETSY store. I also do custom vinyl wall decals… if you’re interested. Your wish is my command!