 |
| Source |
Candy Topper Printables
I had a request for my Candy Toppers to be printable. Remember to print or cut to the correct size. You’ll either have to stretch the image a little or leave a little white border on the sides, like mine.
12 Days til Christmas: Candy Packages
So, this year we are less than overflowing in our finances. It seems that there are a lot of people in the same boat. We didn’t have a ton of money to spend on Christmas, but if I have learned one thing… ok, it would probably be something like don’t put tin foil in the microwave or silence isn’t always the best thing because it usually means I now have some sort of mess to clean up. But one thing I have learned, among all those listed above, is that PRESENTATION MATTERS!
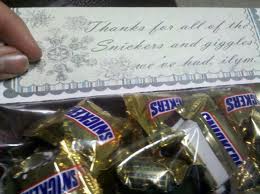
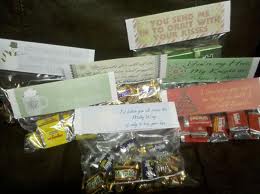
To help dress up My Mr Right’s stocking candy this year (I’m really hoping he doesn’t read this before Christmas, ’cause I’ve posted about several of his gifts…) I bought a couple bags of assorted candies, separated them out and put them in their own individual sandwich bags and sealed them up.
Then, in Photoshop, I created bag toppers. I read the dimensions wrong on the Ziploc box, so the toppers were a little shorter than I was planning, but it still worked out ok. I printed those off and cut them out (in the correct dimensions to fit all the way across the top of the baggie).
I then folded the toppers in half and stapled the top of the zippy baggie in between the two layers. Now, they look a little more professionally made up, rather than just the lame two bags of assorted candies it really is. And they have cute little love notes on them. Everyone likes to get love notes.
There are printables HERE.
12 Days til Christmas: Dryer Vent Wreath
Ok, so you may remember this project over at House of Hepworth’s around Halloween. It was all over the blogosphere, I know I saw it at least three times. And rightfully so, it’s super cute! I kinda wanted to make one too, but I thought ‘everyone’s doing it…’ and I wanted something new. So I stashed the idea in my mental filing cabinet, unsure of whether it would stay filed or not. My mental filing system isn’t always reliable. Lol.
Well, I was fulfilling an order and needed a bigger picture frame. I wasn’t really thrilled with the idea of running to Walmart two Saturdays before Christmas. That place is a zoo when it’s not Christmas time. I thought ‘well, I’ll go check the thrift store that is literally a block away before I drive the 10 minutes to Walmart’. I was rather thrilled when I found a 10×13″ frame in good shape with a $2 sticker on it. Then I noticed a shiny piece of dryer hose…. and I thought about the pumpkin. But, it’s Christmas time, no one’s gonna wanna make pumpkins! I wrapped the ends together and held it up and BAM! Inspiration struck like lightning! Then I noticed the $.25 sticker and I quick like a bunny added it to my picture frame. That ended up being all I got. And, with my military discount, my total was $1.60. He didn’t even charge me for the dryer hose. Sweet! That is the reason I love that thrift store chain so much, I always leave in a much better mood than when I get there. Even when I go in happy. And what little money I do spend (it’s always less than the sticker price) goes to a good cause.
Here is what the inspiration fairies delivered!:
It’s a little plain, but I was going for simple. When I actually have somewhere to display it, I will probably spruce it up some more. The part that got me really excited: I spent maybe a quarter on this project. I did have to buy green spray paint and the little ornament balls and the presents were in the dollar section at Target.
Here’s the how-to:
1) Take your vent hose and decide how big you want your wreath. I didn’t do any cutting on mine, as was already pretty short. If you buy the hose new, though, you will need to trim it down.
2) Spray paint your the hose. I only did one coat, partly because it was really cold outside and partly because I kinda like the silvery glint that shines through. Let it dry completely.
3) Pull the two ends together to make your circle. I used hot glue to secure it. It dries the fastest. Who wants to sit there and hold it while the glue dries, right?
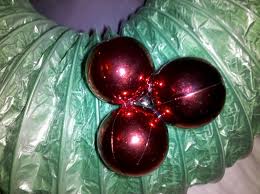
4) I then glued three red ball ornaments together in the shape of holly berries. They are pretty small, smaller than the little ones at the Dollar Tree. I found them in our Target dollar section and have seen them still there in past few days.
5) Glue those styrofoam, foil-wrapped squares on top where ever you would like them placed (those I did get at the Dollar Tree).
6) Wrap a ribbon around the wreath and ht glue the end to where the ribbon meets back up. You can glue the ribbon to the wreath if you want. I tied a half Windsor knot at the top and then secured it with hot glue to hold it in place. Guess it was worth learning how to tie and tie. =]
Mormon Monday: Christmas Edition
I know I have been incredibly neglectful of my FHE blog, but I did manage to get a Christmas lesson up. Check it out here if you’re interested. I wish you all a wonderful Christmas.
And come link up your too-cute Christmas things before it’s too late (the linky will be up until December 27th and your link doesn’t need to be Christmas themed. But if you have Christmas stuff to share, now’s the time!)
- « Previous Page
- 1
- …
- 208
- 209
- 210
- 211
- 212
- …
- 231
- Next Page »


