While He Was Napping

momma gets stuff done

  • Home
  • About
  • Archive
  • Do It Yourself
    • Crafts
      • No Sew
      • Painting
      • Paper Crafts
      • Repurpose Projects
      • Vinyl
      • Washi Tape
      • Kid’s Crafts
      • Fonts
    • Sewing
    • Decorate
      • Home Decor
      • Holiday Decor
    • Celebrate
      • DIY Gifts
      • DIY Your Party
  • Recipes
    • Beverages
    • Appetizer
      • Bread
      • Other Appetizers
    • Snacks
    • Main Dish
      • Meat
        • Chicken
        • Beef
        • Pork
        • Seafood
      • Vegetarian
      • Slow Cooker
      • 30 Minute Meals
    • Dips & Sauces
    • Salads
    • Pasta
    • Soup
    • Dessert
      • Cookies
      • Brownies
      • Cupcakes and Cake
      • Box Mix Recipes
      • Other Sweet Treats
    • Breakfast Food
      • Pancakes
      • Waffles
      • Muffins
      • Other Breakfast Food
  • Family
    • Babies
      • Pregnancy
      • Newborns
      • The 1st Year
    • Toddlers
    • Preschoolers
    • Kindergartners
    • 6-8 Year Olds
    • The Grown Ups
      • Date Night
      • Romantic Gifts
    • Self Care
  • For the Home
    • Cleaning
    • Organizing
    • Emergency Preparedness
  • Travel
    • Travel Tricks & Tips
    • Traveling with Kids
  • Tech & Gadgets
    • Must-Have Apps
    • Techy Home Appliances
    • Gadgets & Electronics
    • Blogging Tips
  • Printables
    • Posters
      • Quote Printables
      • Subway Art Printables
    • Printable Organizers
    • Printable Journals
    • Learning Printables & Worksheets
    • LDS Printables
  • Holidays
    • New Year’s
    • Valentine’s Day
    • St. Patrick’s Day
    • Easter
    • Cinco de Mayo
    • Mother’s Day
    • Father’s Day
    • 4th of July
    • Back to School
    • Halloween
    • Thanksgiving
    • Christmas
    • Holiday & Seasonal Printables
You are here: Home / Blogging: Blog Buttons

May 2, 2011 by Krista

Blogging: Blog Buttons

Every blogger knows the importance of having a blog button.  It’s a simple, approximately 150×150 pixel image that tells the world you exist.  The more places it’s put, the more people see you, the more traffic your site gets.  It’s simple.  But buttons are used for so many other uses too.  Advertising, awards, events, and so many more possibilities.

Here’s the How:
1)  Decide what you want to use your button for.  What do you want to advertise?
2)  Open up your choice of image editing software.  My poison of choice is Photoshop.  You can use a large range of programs from Photoshop to Paint. 
3)  Design your button using text elements, images, digital scrapbooking elements, ect.  With a blog button, less is more.  Only include information that is essential.  Your blog name, event name, dates, a brief overview or slogan for example.
4)  Save your image to your hard drive.  You’ll then need to upload the image to an image hosting site.  Flickr and Photobucket are a couple I use.
5)  Once your image is uploaded to the internet, open up your blogger dashboard.  Click on the Design tab.  Click on the Add a Gadget option.

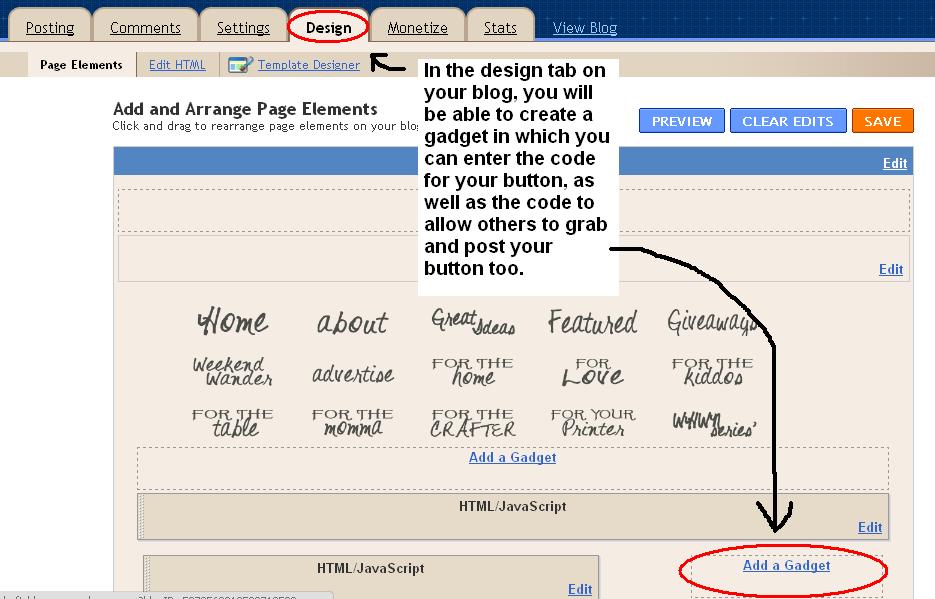
6)  Once the new window opens, scroll down until you find the HTML/JavaScript option.  Click on the blue plus sign to open this window.

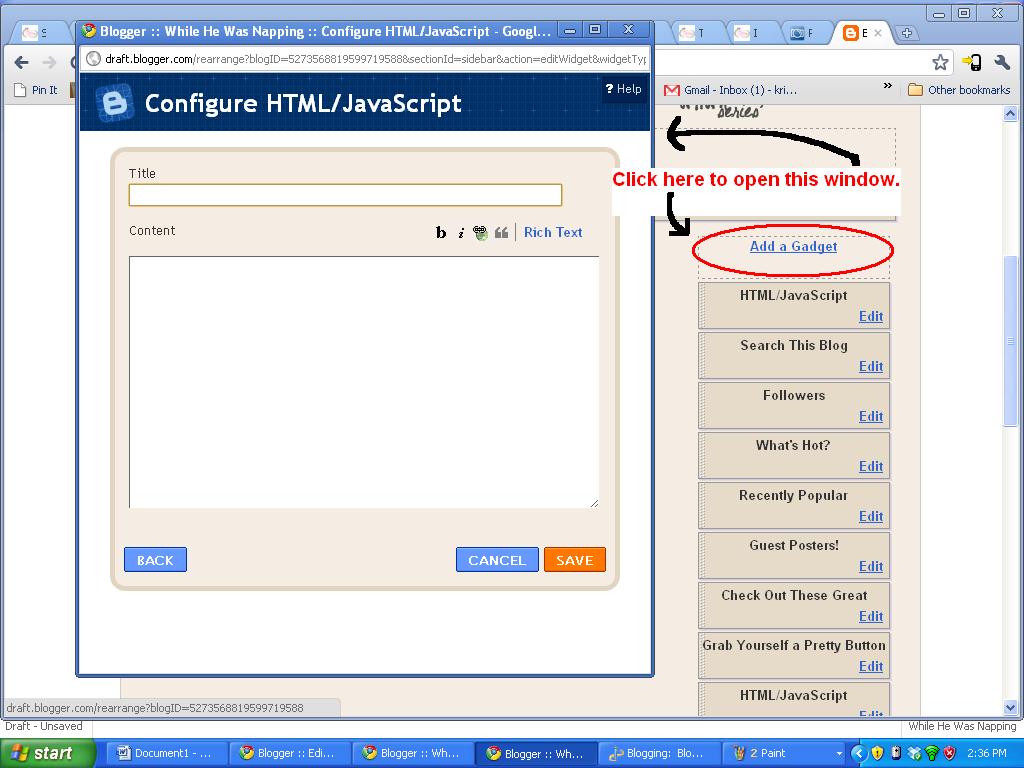
7)  Copy and paste this code into your HTML/JavaScript window:
<center><a href=”ENTER YOUR DIRECT LINK CODE HERE” target=”_blank”><img src=”ENTER YOUR IMAGE CODE HERE” border=”0″ alt=”Photobucket” /></a></center>

8)  Ok, the red text in the code you copied will need to be changed.  From your Photobucket (or whatever host service you are using) copy and paste the Direct Link Code.  Paste it in place of the ENTER YOUR DIRECT LINK CODE HERE text.

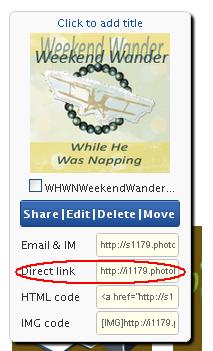
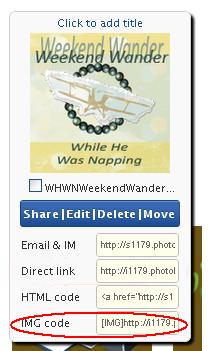
9)   Repeat with the Image Code and put it in place of the ENTER YOUR IMAGE CODE HERE text.  You will need to take out the [IMG] and [/IMG] tags.

10)  Your code should look EXACTLY like this, except with your code in place of the red text.  Save your gadget and go check your blog.  It should show up.

<center><a href=”ENTER YOUR DIRECT LINK CODE HERE” target=”_blank”><img src=”ENTER YOUR IMAGE CODE HERE” border=”0″ alt=”Photobucket” /></a></center>

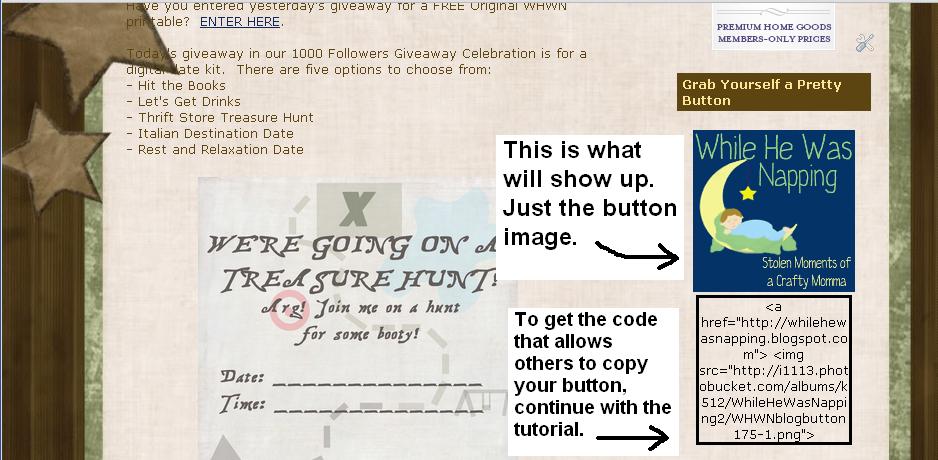
In order to get the box with your code that allows others to copy your button, you will need to add another bit of code to your gadget.  Go back to the gadget you just created.

1)  Copy and paste this entire code underneath the code for your button image.
<center><div style=”border: 3px solid black; color: black; overflow: auto; width: 150px;”>
&lt;a href=”YOUR DIRECT LINK HERE“&gt; &lt;img src=”YOUR IMAGE CODE HERE“&gt;</div></center>

2)  Insert the same codes you did in the same places as you did for the button image code above.  Save the code.  Go check your blog and see if worked.  you should have both the button image and the text box with your code in it.

If you would like some help creating a button, please contact me and we’ll discuss the options.  whilehewasnapping[at]gmail.com

Krista

I'm Krista. Ringleader here on While He Was Napping, wife to my handsome Mr. Right & momma to my THREE energetic boys, Big J (9), Little J (6) & Little N (4). We FINALLY added a beautiful little girl to our family last December.

I’m knee-deep in Tonka trucks & Thomas trains. I survive our crazy days with Vanilla Coke, Sonic slushies, sweet snuggles and little giggles. When I tuck them in tight & kiss them good night, I get a little time to create & just be me.


It all happened
while (s)he was napping
Want More of My Story?

Privacy Policy

While He Was Napping respects your privacy and is committed to keeping any personal information collected on this website confidential. To find out what information we collect and how it is used or what options you have regarding your information, see our full privacy policy here. Creative Commons License The website found at whilehewasnapping.com and all subdomainsauthored and published by Krista is licensed under a Creative Commons Attribution-NonCommercial-NoDerivs 3.0 Unported License.

Pretty Chic Theme By: Pretty Darn Cute Design