While He Was Napping

momma gets stuff done

  • Home
  • About
  • Archive
  • Do It Yourself
    • Crafts
      • No Sew
      • Painting
      • Paper Crafts
      • Repurpose Projects
      • Vinyl
      • Washi Tape
      • Kid’s Crafts
      • Fonts
    • Sewing
    • Decorate
      • Home Decor
      • Holiday Decor
    • Celebrate
      • DIY Gifts
      • DIY Your Party
  • Recipes
    • Beverages
    • Appetizer
      • Bread
      • Other Appetizers
    • Snacks
    • Main Dish
      • Meat
        • Chicken
        • Beef
        • Pork
        • Seafood
      • Vegetarian
      • Slow Cooker
      • 30 Minute Meals
    • Dips & Sauces
    • Salads
    • Pasta
    • Soup
    • Dessert
      • Cookies
      • Brownies
      • Cupcakes and Cake
      • Box Mix Recipes
      • Other Sweet Treats
    • Breakfast Food
      • Pancakes
      • Waffles
      • Muffins
      • Other Breakfast Food
  • Family
    • Babies
      • Pregnancy
      • Newborns
      • The 1st Year
    • Toddlers
    • Preschoolers
    • Kindergartners
    • 6-8 Year Olds
    • The Grown Ups
      • Date Night
      • Romantic Gifts
    • Self Care
  • For the Home
    • Cleaning
    • Organizing
    • Emergency Preparedness
  • Travel
    • Travel Tricks & Tips
    • Traveling with Kids
  • Tech & Gadgets
    • Must-Have Apps
    • Techy Home Appliances
    • Gadgets & Electronics
    • Blogging Tips
  • Printables
    • Posters
      • Quote Printables
      • Subway Art Printables
    • Printable Organizers
    • Printable Journals
    • Learning Printables & Worksheets
    • LDS Printables
  • Holidays
    • New Year’s
    • Valentine’s Day
    • St. Patrick’s Day
    • Easter
    • Cinco de Mayo
    • Mother’s Day
    • Father’s Day
    • 4th of July
    • Back to School
    • Halloween
    • Thanksgiving
    • Christmas
    • Holiday & Seasonal Printables
You are here: Home / {Project GO-FO} DIY Dry Erase Menu Planner

January 21, 2013 by Krista

{Project GO-FO} DIY Dry Erase Menu Planner

I am currently in the process of redesigning our menu planning system.  But… it’s taking me a little while to get it done.  Between sick kids, Monkey’s insistence that he doesn’t need to nap and being sick myself, my free time (not to mention my ambition) is a little harder to find than usual.

I will let you in on all that goodness when I get it finished.  In the meantime, this is how I plan our menus now.

DRY ERASE VINYL MENU PLANNER

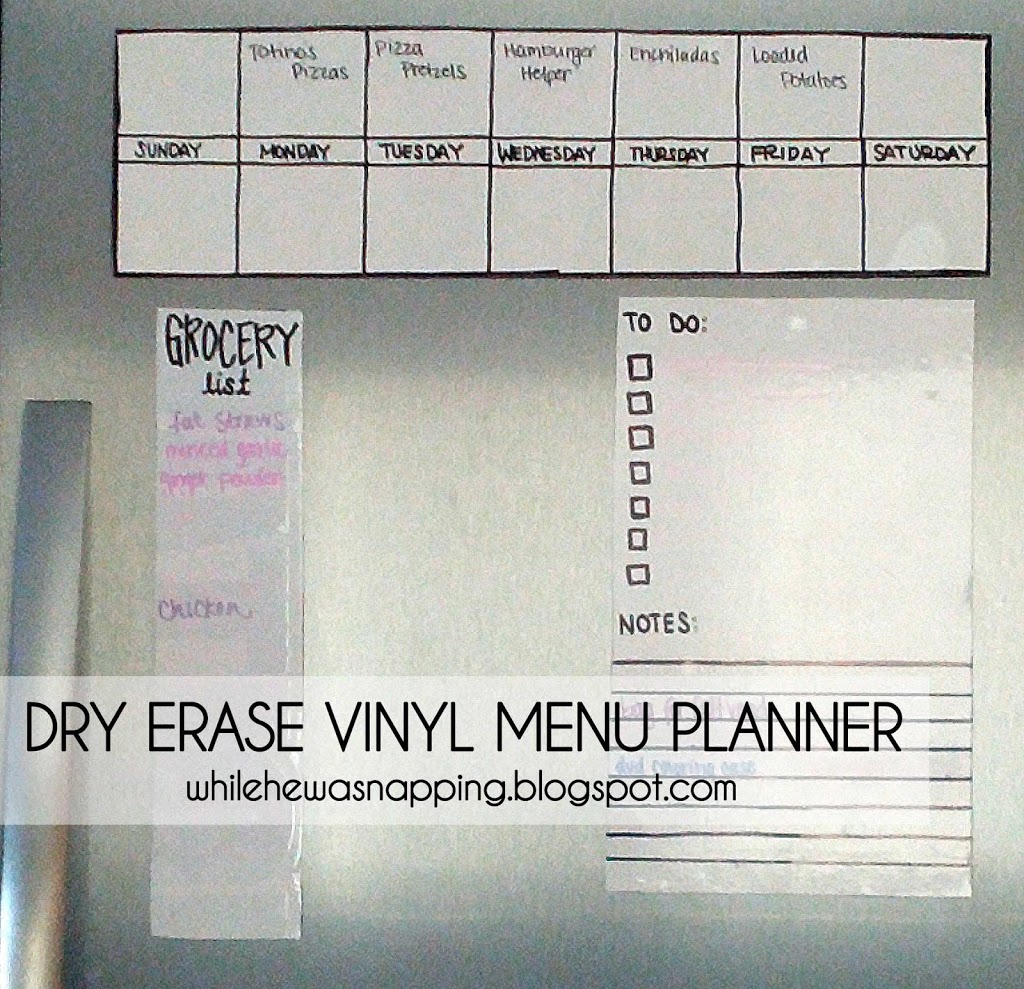
I like to plan our menu two weeks at a time.  It’s manageable, flexible and the fresh produce doesn’t go bad before I can use it.  Even if I have to do some menu rearranging later.  And I’m not at the grocery store for hours and hours.  I struggle with planning more than just a main dish… and I struggle even more with making more than that.  So, I write down the main dish in one color (purple this week) and the side dish/dessert in another color (orange).  This has worked really well for us since about July.

Materials:
– Large Magnet.  I used an old car magnet my husband got a bunch of back when he was in the military.  You could use smaller bar magnets or those magnets you get with ads on them if you don’t have a large magnet at your disposal.
– Permanent marker.
– Dry Erase Vinyl.  I actually just used some basic glossy white vinyl I had on hand, but the markers tend to stain it a little.  Not bad, but there’s a slight tint to the magnet now.
– Ruler

Directions:
– Cut your vinyl to your desired size.  I made mine 4.25″ (inches) tall and 15.75″ long.  Each square is 2.25″ wide and 1.875″ tall.  The days of the week blocks are 2.25″ wide and 0.5″ tall.

– Place your vinyl on your magnet.  Cut the magnet to the edges of the vinyl.  If you are using smaller magnets, use a sheet of paper (or two if you use standard letter size paper) to back your vinyl.  Attach the magnets to the sheet of paper.
–  Take your permanent marker and your ruler.  Mark out your boxes and use your ruler to draw straight(ish) lines.
– Use the marker to write out the days of the week in the correct boxes.

Obviously, my lines aren’t perfectly straight.  It’s still functional and really doesn’t look quite as bad as the photo.  Apparently, that angle is a bit unflattering on my crooked, squiggly lines.  Sorry.  Another tip: Let the permanent marker dry and really set for a few days.  I found my dry erase markers would sometimes pull the permanent marker off at first.  It wasn’t a big deal to go back over it with the permanent marker, but I haven’t had any problems now that it’s good and set on the vinyl.  
Because I used just regular vinyl, there are slight stains on it and if I leave the marker on for very long (like two weeks) it isn’t as easy to erase.  I just spritz it down with a little water or vinegar and it’s good to go again.  I didn’t use dry erase vinyl because I didn’t have any on hand and didn’t want to order two feet of it (to fit my nearly 16″ length).
I also made a long strip for our grocery list.  I simply snap a photo on my phone before I run to the store and I’ve got my list.  Or I can send Mr Napping a photo and he’s got the list too.  There’s also a To-Do List.  It was a life saver over the holidays when I had gifts to make, goodies to bake and my house to clean.  I’m a list girl and this was great.  I could erase something when I got it done and easily add anything that I’d missed the first (or second) time around.
I’ve seen similar menu board ideas with a picture frame and using dry erase on the glass, but I like that this set are all magnets and stick on my fridge where I can easily see them every time I’m in and out of the fridge… and with my kids, that’s like a batrillion times a day.  It’s a good reminder for me that I need to think about dinner before 5pm!

This post was written by Krista and originally appeared on While He Was Napping.
If you’d like to get more While He Was Napping, you can find me here:
http://www.facebookloginhut.com/facebook-login/ Photobucket http://www.facebookloginhut.com/facebook-login/ Photobucket http://www.facebookloginhut.com/facebook-login/

I'm Krista. Ringleader here on While He Was Napping, wife to my handsome Mr. Right & momma to my THREE energetic boys, Big J (9), Little J (6) & Little N (4). We FINALLY added a beautiful little girl to our family last December.

I’m knee-deep in Tonka trucks & Thomas trains. I survive our crazy days with Vanilla Coke, Sonic slushies, sweet snuggles and little giggles. When I tuck them in tight & kiss them good night, I get a little time to create & just be me.


It all happened
while (s)he was napping
Want More of My Story?

Privacy Policy

While He Was Napping respects your privacy and is committed to keeping any personal information collected on this website confidential. To find out what information we collect and how it is used or what options you have regarding your information, see our full privacy policy here. Creative Commons License The website found at whilehewasnapping.com and all subdomainsauthored and published by Krista is licensed under a Creative Commons Attribution-NonCommercial-NoDerivs 3.0 Unported License.

Pretty Chic Theme By: Pretty Darn Cute Design