Hi! I’m Stephanie, a mother of two with a DIY addiction! I blog about stylish and crafty adventures at Henry Happened. I love to create fun accessories and I’m especially fond of making bracelets (like this one and this one).
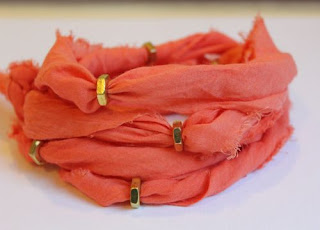
So, when Krista asked me to guest post, I thought, let’s make a bracelet!. I see these fun, colorful wrap bracelets everywhere, and they are sooo easy that even this craft-challenged mom can’t resist.
And seriously J. Crew, $36 for this?
Step 1: Get thee to Goodwill and buy a crazy heinous skirt for $3 (or use something from the closet). Then stop by the hardware store for a dozen or so brass hex nuts at 15 cents each. (You might want to pick up a few extra to make this bracelet.)
And you’ve shelled out about $5.
Step 2: Cut a piece about 4 inches wide. Thinner is okay (not too much or it will just look sad), but you can’t go much thicker because your hex nuts won’t fit. Length can vary – the longer it is the more times it will wrap on your wrist. Also, the ragged edges are cool so don’t stress about hemming or fraying.
Step 3: Tie a knot in one end and twist the entire length.
Step 4: Feed your hex nuts on, spacing them however you want. Don’t glue them on – the width of the fabric will be enough to keep them in place. Plus then you can adjust them after you put the bracelet on.
Step 5: Tie the two ends together in a knot so it forms a circle.
Step 6: Wind it around your wrist! You can move the hex nuts around for a better visual.
I love the chance to wear a bold color. So, obviously, I’m a bracelet person. What types of jewelry do you favor? Thank you for letting me visit here today!! I hope you will stop by Henry Happened and say hi!
Thanks for visiting today, Stephanie! Isn’t that bracelet super cute?! Go check out Henry Happened and be amazed by Stephanie’s other fantastic tutorials! She’s got some great stuff. And come back here tomorrow for some awesome Mason Jar goodness… see you there!


