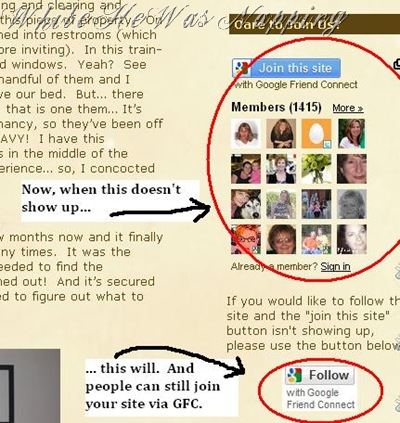
I don’t know about anyone else, but I have had problems with my GFC followers widget showing up for several months now. I have been so frustrated with it, because I know there are blogs I’ve tried to follow and can’t find their buttons, so I just leave. I don’t have all day to reload the page until the widget decides to show up. I wanted some way to put my own button on my blog without it being attached to Blogger’s widget.
The other day I saw a stand alone button and thought “That is SUCH a good idea! I want one of those!” And then I closed the window and did something mommy related, I’m sure, completely forgetting where I had seen that. And then my Followers widget seemed to take a drastic dive in its already less-than-stellar performance. Anytime I checked my site (as I was doing some maintenance and upkeep, it was fairly often) the GFC widget NEVER loaded. EVER. Ok, like twice maybe. So, began my Google searching. I couldn’t find a tutorial on it anywhere. I’d pretty much given up. I was blog surfing the other day and found a comment with the link that saved my life. Ok, a little dramatic, yes. But, I’ve spent FOREVER months trying to figure this out. You can check out the original tutorial on loveyoualwaysgiveaways.com.
Here’s the How on adding a stand alone GFC Button to your site:
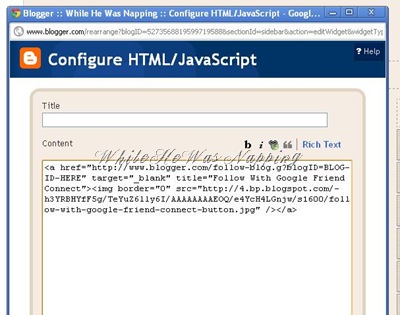
1. You will need this code:
<a href="http://www.blogger.com/follow-blog.g?blogID=BLOG-ID-HERE" target="_blank" title="Follow With Google Friend Connect"><img border="0" src="http://4.bp.blogspot.com/-h3YRBHYfF5g/TeYuZ6lly6I/AAAAAAAAEOQ/e4YcH4LGnjw/s1600/follow-with-google-friend-connect-button.jpg" /></a>
Copy and paste that exactly as it is.
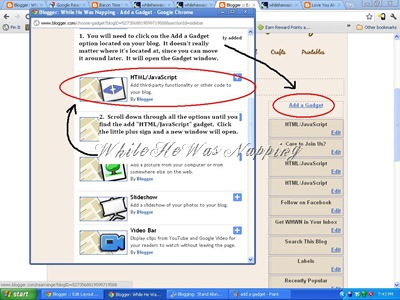
2. Go to your Design tab and select Add a Gadget. P.S. Click on the images to make them larger.
3. Find the HTML/JavaScript Gadget and select it. A new window will open.
4. Paste the code above into the new window.
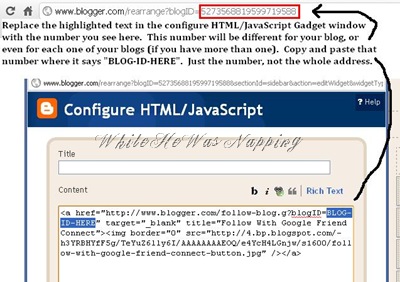
5. Back in your browser, on your design tab page, look up to the address bar. It should look something like this. Copy the number on the end and replace the red BLOG-ID-HERE text with the number. Just the number, not the whole address.
6. Save the gadget. You can then drag and drop it like any other gadget anywhere you want on your blog template. Save the changes and view your blog to make sure it all worked.
Krista


