While He Was Napping

momma gets stuff done

  • Home
  • About
  • Archive
  • Do It Yourself
    • Crafts
      • No Sew
      • Painting
      • Paper Crafts
      • Repurpose Projects
      • Vinyl
      • Washi Tape
      • Kid’s Crafts
      • Fonts
    • Sewing
    • Decorate
      • Home Decor
      • Holiday Decor
    • Celebrate
      • DIY Gifts
      • DIY Your Party
  • Recipes
    • Beverages
    • Appetizer
      • Bread
      • Other Appetizers
    • Snacks
    • Main Dish
      • Meat
        • Chicken
        • Beef
        • Pork
        • Seafood
      • Vegetarian
      • Slow Cooker
      • 30 Minute Meals
    • Dips & Sauces
    • Salads
    • Pasta
    • Soup
    • Dessert
      • Cookies
      • Brownies
      • Cupcakes and Cake
      • Box Mix Recipes
      • Other Sweet Treats
    • Breakfast Food
      • Pancakes
      • Waffles
      • Muffins
      • Other Breakfast Food
  • Family
    • Babies
      • Pregnancy
      • Newborns
      • The 1st Year
    • Toddlers
    • Preschoolers
    • Kindergartners
    • 6-8 Year Olds
    • The Grown Ups
      • Date Night
      • Romantic Gifts
    • Self Care
  • For the Home
    • Cleaning
    • Organizing
    • Emergency Preparedness
  • Travel
    • Travel Tricks & Tips
    • Traveling with Kids
  • Tech & Gadgets
    • Must-Have Apps
    • Techy Home Appliances
    • Gadgets & Electronics
    • Blogging Tips
  • Printables
    • Posters
      • Quote Printables
      • Subway Art Printables
    • Printable Organizers
    • Printable Journals
    • Learning Printables & Worksheets
    • LDS Printables
  • Holidays
    • New Year’s
    • Valentine’s Day
    • St. Patrick’s Day
    • Easter
    • Cinco de Mayo
    • Mother’s Day
    • Father’s Day
    • 4th of July
    • Back to School
    • Halloween
    • Thanksgiving
    • Christmas
    • Holiday & Seasonal Printables
You are here: Home / Cork Board Jewelry Organizer

March 6, 2013 by Krista

Cork Board Jewelry Organizer

I have a thing for corks.  Not like obsessive, crazy collecting – I just love the natural feeling they can give a project.  However…. I don’t drink.  None of my family does.  Or my friends.  So, my cork supply was limited.  I ended up buying a bag of them off of Amazon for about a quarter a cork.  I didn’t really have a specific project in mind, but I did want to figure out some way to make my jewelry easier to use.

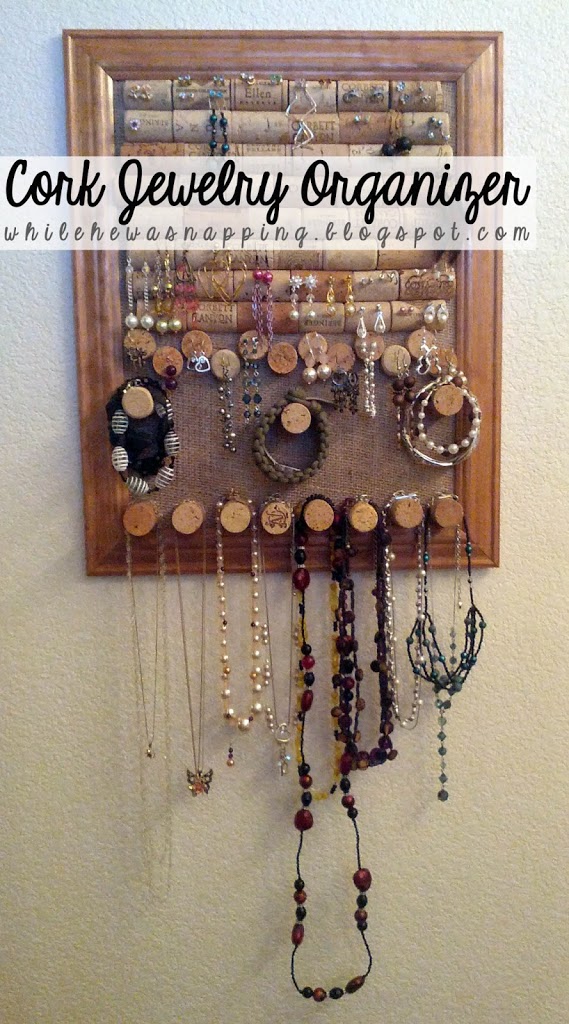
Then, one day, I was trying to sort through my knotted mess of necklaces and I knew it was time to get to planning an organizer.  Enough is enough.  I started brainstorming and before long, this masterpiece was born.

CORK BOARD JEWELRY ORGANIZER

Cork board Jewelry Organizer

Materials:
– 39 Corks (You can collect them as you drink wine or do like I did and get them from Amazon, affiliate link)
– 11×14″ Picture Frame
– 11×14″ Cardboard Piece
– 12×15″ Burlap
– Hot Glue Gun and Glue Sticks
– Razor Blade
– Sharp Knife and Cutting Board
Directions:
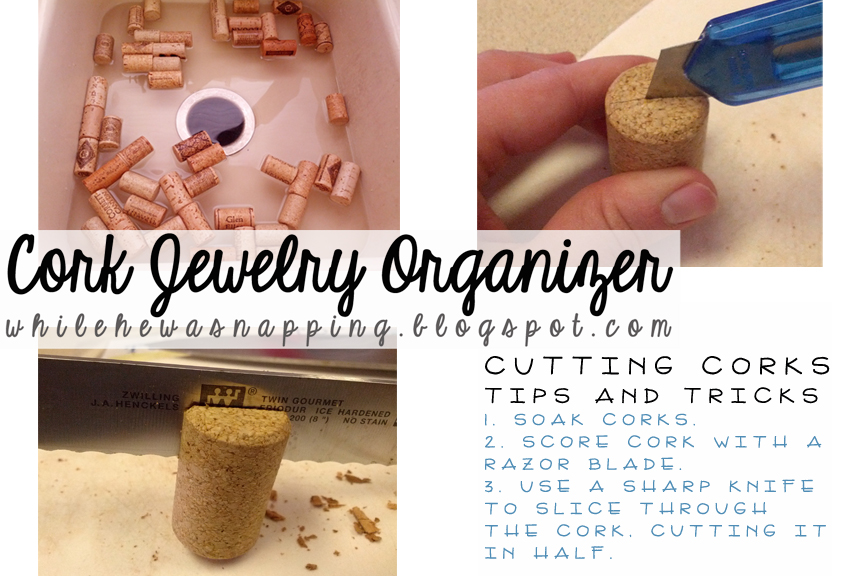
– Soak your corks in water for approximately ten minutes.  I told my husband about this and he just laughed at me.  Supposedly, it’s supposed to make the corks crumble less when you cut them.  I did soak mine, but I don’t know if it helped or not… so I guess this is optional.
– Cover the cardboard piece with the burlap.  Use hot glue to secure the edges of the burlap right to the back of the cardboard piece.  Insert and secure the burlap-covered cardboard into the picture frame.
– Take a cork and score around it lengthwise with the razor blade.
– Use a sharp knife to slice the corks in half, using your score line as a guide.  (I used both a bread knife and a chef’s knife.  There was a little more crumbling with the serrated bread knife than the clean edge of the chef’s knife.  But the serrations were kind of nice to break through the cork in the middle where the razor blade didn’t reach to score the cork.)
– Repeat the last step until 24 of the corks have been cut in half.
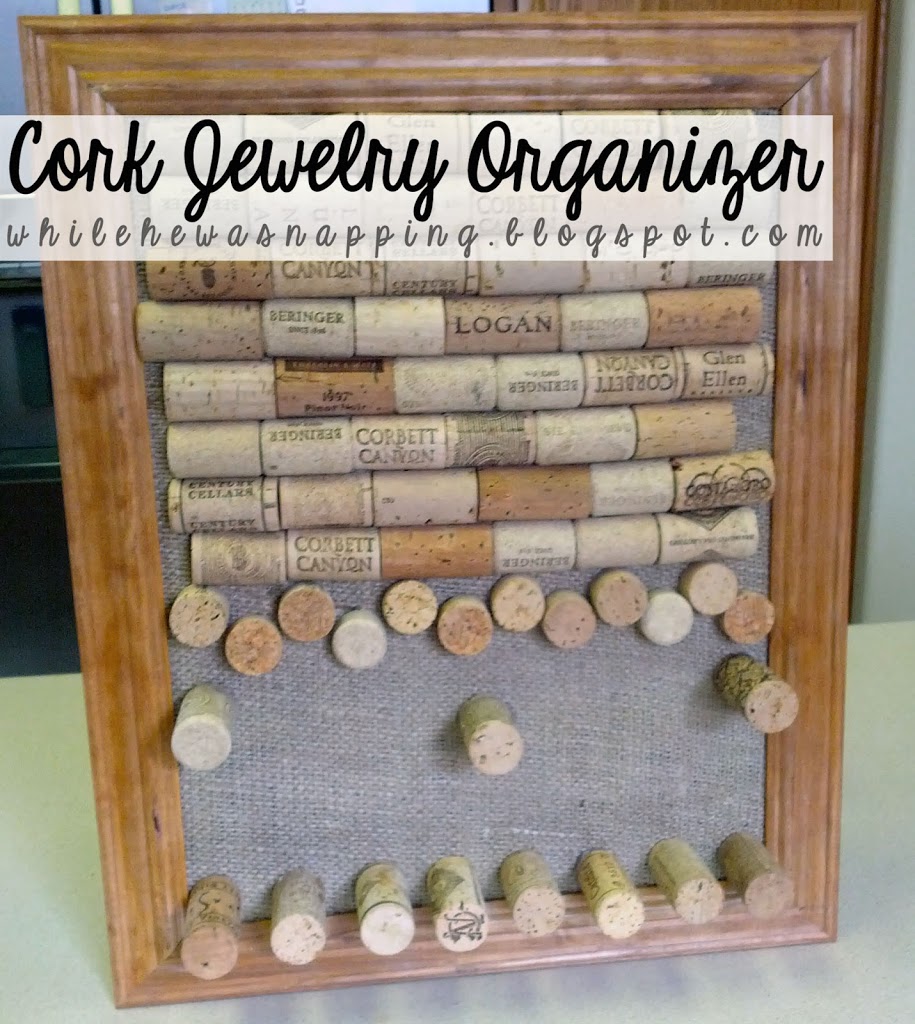
– Using the hot glue gun, glue the halved corks to the burlap.  You should have 48 halves.  I did 8 rows of six cork halves in the top half of my frame.  The rows will not line up perfectly, as not all corks are exactly the same size.  You can lay out your corks first and get an idea of placement.
– I then cut five corks into thirds (ish) and glued the disks in a chevron pattern underneath the cork halves.
–  I took three whole corks and glued them the disks about an inch or so below the disks for my bracelets.
–  Under that, at the very bottom edge of the frame I glued eight more whole corks.  If you have a lot of chunky necklaces, you may want to do fewer corks on the bottom edge.  My long red and black necklace doesn’t fit super great because the beads are so big.

– Hang and put all your jewelry on the organizer.  All DONE!
I love this organizer!  It has made my life sooo much simpler and better.  AND I actually wear my jewelry now because it’s easy to see, easy to get to and easy to put away.  AH-MAY-ZING!

This post was written by Krista and originally appeared on While He Was Napping.
 

I'm Krista. Ringleader here on While He Was Napping, wife to my handsome Mr. Right & momma to my THREE energetic boys, Big J (9), Little J (6) & Little N (4). We FINALLY added a beautiful little girl to our family last December.

I’m knee-deep in Tonka trucks & Thomas trains. I survive our crazy days with Vanilla Coke, Sonic slushies, sweet snuggles and little giggles. When I tuck them in tight & kiss them good night, I get a little time to create & just be me.


It all happened
while (s)he was napping
Want More of My Story?

Privacy Policy

While He Was Napping respects your privacy and is committed to keeping any personal information collected on this website confidential. To find out what information we collect and how it is used or what options you have regarding your information, see our full privacy policy here. Creative Commons License The website found at whilehewasnapping.com and all subdomainsauthored and published by Krista is licensed under a Creative Commons Attribution-NonCommercial-NoDerivs 3.0 Unported License.

Pretty Chic Theme By: Pretty Darn Cute Design